Step 1. The Lock Screen
Your Android-based terminal may have a lock screen, preventing unauthorized button presses while the device is not in use. It may also be configured with optional security features, such as a PIN code or gesture. By default, no security option will be enabled and the screen will look like the image below:
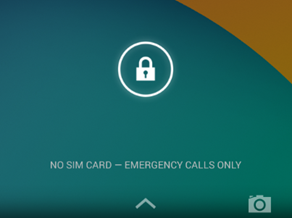
By performing an upward swipe (Taking one finger and pressing it on the bottom of the screen, dragging it upwards, and lifting, as demonstrated below), the device can be unlocked and used. If a security feature is enabled, it will appear here.

Step 2. The Navigation Bar
At the bottom of the screen of your device, you will see the following bar (Note: The options may be in a different order depending upon the model)
![]()
Square Button: This functions as a quick toggle between recently used apps. Pressing it once will show a vertical list allowing you to jump between apps you select.
Circle Button: This will minimize the current app and take you to the home screen.
Triangle Button: This is the back button, and will take you back to the previous page in your browser or undo the last action in an app (Note: This will not undo or reverse a sale while within the payment application).
3. Launching the EVO Payment App
In order to run sales, a payment application will need to be launched. This differs depending upon the model. Examples are included below:

Pax

Nexgo

Dejavoo
Instructions on how to run sales are in the QRG for the appropriate guide for your device.
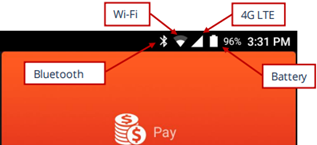
Step 4. Status Bar
Your Android-based terminal may have a lock screen, preventing unauthorized button presses while the device is not in use. It may also be configured with optional security features, such as a PIN code or gesture. By default, no security option will be enabled and the screen will look like the image below:
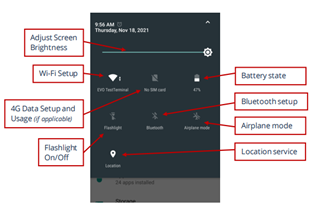
Step 5. Quick Settings
By swiping down from the status bar on the top, it will drag down the quick settings tray, which includes several convenient options to perform common functions.
Step 6. Settings
By tapping on the settings icon from the Home screen, the Android terminal will display multiple menu options. Your terminal may prompt you for a password (included with pack-in information with your terminal, or provided by EVO Technical Support). Some common ones are below.
By tapping on the settings icon from the Home screen, the Android terminal will display multiple menu options. Your terminal may prompt you for a password (included with pack-in information with your terminal, or provided by EVO Technical Support). Some common ones are below.
a. Wi-Fi
i. Select Wireless & Networks > Wi-Fi from the menu.

ii. Ensure the WiFi toggle is set on.
iii. Select the Network you wish to connect to (If not visible, ensure the router is active, and if hidden,
press the three dots in the top and manually enter the network information).
iv. When prompted for a password, enter the network password and press connect.
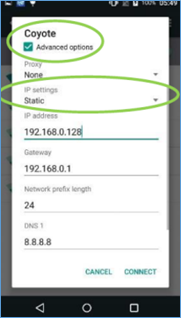
v. (Optional) If any non-standard settings are required, such as a static IP setup, check the box marked
“Advanced Options” to enter the additional information. Tap Save.
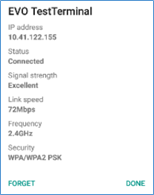
vi. If the IP address on the device is required, tap on the “Connected” Network from step iii and the
information will appear.
b. Security/Lock Screen Setup
i. In the Settings menu, select “Security.”
ii. Tap the “Screen Lock” option in the menu.
iii. Tap the desired security method for the lock screen.
Options include:

iv. In the Settings menu, select “Security.”
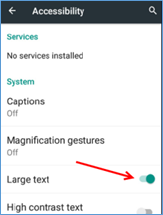
c. Large Text
i. Tap “Accessibility”
ii. Enable the “Large Text” option for easier reading.